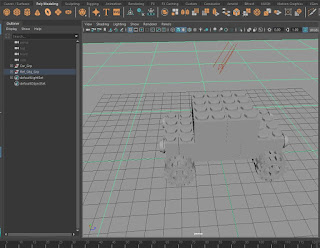
During this time the main focus was learning to texture
the model car. This consisted of grouping all of the pieces and making sure
that the car is in the centre of the grid. To start texturing; a ground plane
has to be created, which acts like a background when rendering. Alongside this
I inserted a light to simulate sunlight that would create the shadows. (Figure
1)
 |
| Figure 1 |
When rendering the Arnold render is used, when I pressed
play it created the IPR render (Figure 2). I also made sure to scale up the
plane so the edges did not show in the background. Once the render was stopped,
I was then able to move onto adding colour onto the car. To do this I started
with the main body so shift selected it all, I was then able to assign a new
material. This was under the Arnold dropdown box and its shader is called Ai
Standard Surface (Figure 3). It allowed me to use the attribute editor to
assign the selected blocks with a material and to change its colour.
 |
| Figure 2 |
 |
| Figure 3 |
Under the hypershade tool I was able to make the glass
pieces slightly transparent by changing settings under the transmission
dropdown box (Figure 4). I was also able to change the colour and the
reflectiveness. Before rendering again, I changed the image size which is under
the render settings and within the common tab. (I changed the image size to
Preset HD1080)
 |
| Figure 4 |


Comments
Post a Comment